小程序开发中遇到的注意点(continue to update…)
组件传参,不能使用驼峰命名,要用-
<!-- 错误示例: -->
<view  bindtap="goProductDetail" data-productId="{{info.productId}}">
</view>
<!--  即使上面利用驼峰命名,获取的时候也取不到productId,只能拿到productid -->
<!-- 正确示例: -->
<view  bindtap="goProductDetail" data-product-id="{{info.productId}}">
</view>
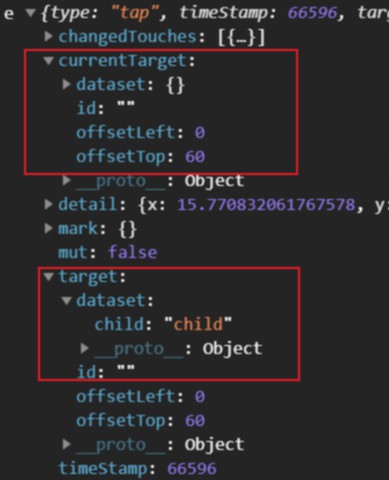
e.currentTarget.dataset和e.target.dataset的区别
e.target 事件源组件对象,e.currentTarget 当前组件对象;

用户点击了内层的view,是触发事件的源头,而正在触发的事件被绑定在外层的view中,于是,当想要获得内层组件的dataset时,就要使用指向触发事件的源头的e.target。以下,触发事件的组件和正在触发的组件是同一个,两个都可以用。
<view bindtap="parentFunc">
  <view data-child="child">测试</view>
</view>
自定义组件
onLoad执行时机
会触发导航栏tabBar页的
onLoad:- 首次进入到有导航栏的页面
- 从微信分享进入到有导航栏的页面
- 识别二维码跳转到有导航栏的页面
- 使用了
uni.reLaunch后销毁了所有其他页面
非tabBar页执行onLoad时机,只要进入就会执行;
无论什么页面,只要显示就会执行 onShow
onLaunch 和 onLoad 生命周期
执行时机:
- onLaunch在小程序启动并完成初始化后触发,只触发一次;
- onLoad在一个页面开始加载到卸载这个页面之中是一次,但运行过程中不止一次。如反复进入(加载)并退出(卸载)。
不同场景:
场景 onLaunch onLoad 下拉小程序 短时间不执行 短时间不执行 扫描太阳码 短时间不执行 执行 reLaunch 短时间不执行 执行 执行顺序:
- 一般onLaunch先于onLoad,同步请求无法保证
- 若onLoad依赖onLaunch请求的结果,可以将onLoad请求放到onLaunch的回调中
onLaunch() { wx.login({ success: function (res) { const code = res.code; getUnionIdByCode({ code }).then((res) => { wx.setStorageSync(constant.OPENID, res.model.openIdMini) wx.setStorageSync(constant.UNIONID, res.model.unionId) if(that.checkScanCallback){ that.checkScanCallback() }})}})}onLoad() { app.checkScanCallback = async () => { const unionId = wx.getStorageSync(constant.UNIONID); if (unionId) { const { model: res } = await apiCheckScan({ unionId }); if (res) { } else { // 未扫描过的扫描完成注册 this.setData({ hasScan: false, })}}}}
路由
wx.navigateTo保留当前页面,跳转到应用内的某个页面,但不能跳到 tabBar 页面;wx.redirectTo关闭当前页面,跳转到应用内的某个页面,但不允许跳到 tabBar 页面;wx.switchTab跳转到 tabBar 页面,并关闭其他所有非 tabBar 页面;wx.reLaunch先关闭所有页面再跳转到任何页面;wx.navigateBack先关闭当前页面,返回上一级或多级页面;<navigator></navigator>组件方式跳转:
<navigator url="/pages/gd/gd" open-type="navigateTo">更多 ></navigator>
onReachBottom事件不触发
父元素加上overflow:auto会导致onReachBottom事件不触发,原因是页面高度超过屏幕出现滚动条才能触发此事件。
长按识别图片二维码
<image src="二维码图片地址" show-menu-by-longpress="true"></image>
<!-- 利用image的show-menu-by-longpress属性 -->
更多参考《讨论一下微信小程序中如何长按识别图片中二维码跳转》
wx.showModal
- confirmText 的色值设置时,微信设置深色系统无作用;
- 手机返回键会将其关闭,若有强制使用modal场景,自己封装。
wx.showToast和wx.showLoading只能显示一个
- 关闭loading,wx.hideLoading会导致wx.showToast关闭。

两者区别:wx.showToast展示时,页面其他元素是可以点击的;wx.showLoading展示时,页面其他元素是不可以点击的(像创建订单这种,可以使用wx.showLoading来防止用户频繁操作。)
列表接口请求对应生命周期
- 若无特殊情况,可写在 onLoad 中,列表点进去返回列表,不重新请求接口,不影响用户体验;
- 若有特殊情况必须写在 onShow 中,且去重,不去重会出现重复请求。
返回上一个列表页面并更新数据
注意:列表请求放在 onLoad 中,从其他页面返回并更新列表数据;放在 onShow 问题比较多。解决思路有两个:
- 使用微信提供的
eventChannel,但仅限于两个页面;//场景:A页面 => B页面 => A页面 //A页面: wx.navigateTo({ url: '', events: { // 添加监听器(事件名可以自定义) getMassMsgList: function() { that.setData({ currentPage: 1, list:[] }) that.massList(); }}}) //B页面: setTimeout(()=>{ wx.navigateBack({ delta: 1, success:function () { /*注意: ① 下方代码写在success中,无需其他操作,返回到上一页,上一个页面数据已经更新,滚动条也在顶部。 ② 若下方代码写在setTimeout上面,由于当前页面还未返回到上一页,是在当前页面加载上一页的数据, 直接使用wx.pageScrollTo({scrollTop: 0,}),由于针对的是当前页面,对上一页无法生效,可以传递参数 在上一页onShow中加判断,从而调取wx.pageScrollTo({scrollTop: 0,}) */ // 跳转成功之后,发布获取群发消息列表事件: const eventChannel = that.getOpenerEventChannel() eventChannel.emit('getMassMsgList'); } }) },1000) - 使用
getCurrentPages// A页面代码 /* ① 由于im窗口与生成护肤建议单页面中间间隔其他页面,无法使用eventChannel ② 使用回调函数方式,im窗口声明下方回调,在创建护肤建议单成功之后路由跳转之前执行此回调 */ historyMsgcallback() { this.setData({ currentPage:1, chatList:[] }) this.getHistory(1) }, // B页面代码 /* 注意:getCurrentPages()获取路由栈方法: ① 在wx.navigateBack之前调取没问题(补充,若有业务场景,返回上一页之后需要回到顶部 可以在此处直接改变上一页数据,例如:page.setData({isBackTop:true})) 上一页根据isBackTop字段在onShow生命周期中做判断是否调取wx.pageScrollTo({scrollTop: 0,})。 ② 此方法写在wx.navigateBack的success回调中,需要注意: a.ios系统:获取到的路由栈是已经返回上一页的,安卓:获取到的路由栈是未返回之前的,取值需区分; b.也可以使用setTimeout延时500ms-1000ms获取到路由栈,此时路由栈ios和安卓是相同的, 均是已经返回上一页之后的,延时时间控制有些不严谨。 */ const page = getCurrentPages().slice(-3)[0] if(page.route === "pages/chat/chatDetail/chatDetail"){ page.historyMsgcallback() } setTimeout(()=>{ wx.navigateBack({ delta: 2 }) },1000)
自定义tab点击时下划线滑动有动效
<view class="navbar">
  <view wx:for="{{navbar}}" data-idx="{{index}}" class="item" wx:key="index" bindtap="changeTab">
    <text class="{{currentTab==index ? 'active' : ''}}">{{item}}</text>
  </view>
  <view class='line' wx:if="{{left}}" style="left:{{left}}px"></view>
</view>

changeline() {
    const query = wx.createSelectorQuery()
    const _this = this
    query.select('.active').boundingClientRect()
    query.exec(function (res) {
        _this.setData({
            left: res[0].left + res[0].width / 2 - 114*_this.data.ratio/2 - 12
        })
    })
},
// 元素left + 元素宽/2 - 下划线宽度(rpx => px,单位动态转换)- 最外边距(有的没有)
new Date()转换时间时间格式时iOS不兼容
iOS无法识别'-',使用new Date((time)).replace(/-/g,"/")转化成'/'
h5与微信小程序间的跳转
1. h5 => 小程序:参考《微信公众号跳转小程序 wx-open-launch-weapp》,利用wx-open-launch-weapp
INFO
js接口安全域名主要用于微信公众号,如果大家要进行微信的开发,创建公众号是需要填写js接口安全域名的。当我们运用程序的时候,网络是会自动验证安全域名的,它可以解决服务器终端的语言问题,能够让访问正常的运行,只有使用好js接口安全域名,网上的用户才能够访问到网页。
- 微信 JS-SDK 鉴权,需登录微信公众号平台进入公众号设置=> 功能设置 => JS接口安全域名
export default {
init(url) {  //需要使用的api列表
  return new Promise((resolve,reject)=>{
    wxConfigApi({params:url}).then(
      value=>{
        let data = value;
        wx.config({
          debug: false,
          appId: data.appid, // 必填,公众号的唯一标识
          timestamp: data.timestamp, // 必填,生成签名的时间戳,精确到秒
          nonceStr: data.nonceStr, // 必填,生成签名的随机串
          signature: data.signature, // 必填,签名
          jsApiList: [
            'chooseImage',
            'startRecord',
            'stopRecord',
            'onVoiceRecordEnd',
            'playVoice',
            'pauseVoice',
            'stopVoice',
            'onVoicePlayEnd',
            'uploadVoice',
            'downloadVoice',
            'getLocalImgData',
            'hideMenuItems'
          ], // 必填,需要使用的JS接口列表
          openTagList: ['wx-open-launch-weapp']
        });
        wx.ready(res => {  // 微信SDK准备就绪后执行的回调。
          resolve(wx,res);
          wx.hideMenuItems({
              menuList: ["menuItem:copyUrl","menuItem:share:appMessage","menuItem:share:timeline","menuItem:share:qq","menuItem:share:weiboApp","menuItem:share:facebook","menuItem:share:QZone"] // 屏蔽复制链接
})})})})}}
- 文件中使用:
<wx-open-launch-weapp
id="launch-btn"
username="gh_b7eaeaa4472c"
path="pages/index/index.html"
>
  <script type="text/wxtag-template">
    <div class="btn">跳转</div>
  </script>
</wx-open-launch-weapp>
<style>
#launch-btn{
  width: 100%;
  display: flex;
  justify-content: center;
}
</style>
2. 小程序 => h5,利用webview:
- 新建 webview 文件夹;
- webview.wxml文件中只需要写一行代码
<web-view src="{{url}}"></web-view>; - webview.js文件中进行赋值:
onLoad(options) { this.setData({ url: options.url }) }, - 在需要跳转的地方直接用wx.navigateTo进行跳转,将url传递过去:
bannerLink(e) {
const type = e.currentTarget.dataset.type;
const redirectUrl = e.currentTarget.dataset.url;
//1=h5页面, 2=小程序页面
if (type == 1) {
  if (redirectUrl) {
    wx.navigateTo({
      url: "/pages/webView/webView?url=" + redirectUrl
    });
  }
} else if (type == 2) {
    if (redirectUrl) {
      wx.navigateTo({
        url: redirectUrl
})}}}
动态设置swiper高度
  <swiper
    autoplay
    circular="true"
    indicator-dots
    indicator-color="rgba(39, 39, 39, .4)"
    indicator-active-color="#272727"
    class="swiper-box"
    style="height:{{bannerImgHeightsArr[curIndex]}}rpx;"
    bindchange='bannerSwitch'>
    <swiper-item class="swiper-item" wx:for="{{swiperList}}" wx:key="index">
      <image
        class="img"
        src="{{item.imageUrl}}"
        data-url="{{item.redirectUrl}}"
        data-type="{{item.contentType}}"
        bindtap="bannerLink"
        bindload="imageLoad"
        data-id="{{index}}"
        mode="widthFix"/>
    </swiper-item>
  </swiper>
imageLoad(e) {
  let imgW = e.detail.width,
      imgH = e.detail.height,
      ratio = imgW / imgH;
  // 按照宽度100%(750)来展示,计算banner图对应展示的高度
  let bannerViewHeight = 750 / ratio;
  let bannerImgHeightsArr = this.data.bannerImgHeightsArr;
  bannerImgHeightsArr[e.target.dataset.id] = bannerViewHeight;
  this.setData({
    bannerImgHeightsArr: bannerImgHeightsArr
  })
},
bannerSwitch(e) {
  this.setData({
    curIndex: e.detail.current
  })
}
照片加载失败处理(利用image标签的binderror事件)
<view
  class="video_box"
  wx:if="{{item.msgType === 3}}"
  catchtap="playVideos"
  data-url="{{item.message.message}}"
>
  <image
    class="info_img"
    binderror="errorCover"
    data-errorimg="{{index}}"
    mode="heightFix"
    src="{{item.errImgSrc?item.errImgSrc:item.message.cover}}"
  ></image>
</view>
errorCover(e) {
  if(e.type=="error"){
    const errorImgIndex = e.target.dataset.errorimg //获取错误图片循环的下标
    const newArr = this.data.chatList
    newArr.forEach((item,index)=>{
      if(index===errorImgIndex){
        item.errImgSrc = "xxx"
      }
    })
    this.setData({
      chatList:newArr
})}}
上传图片或视频
- 封装微信选择文件,首先选择资源,利用
wx.chooseMedia,此api的success回调中会返回文件临时路径,注意:此结果是个数组(因为可以上传多张)。// wx选择文件 const chooseFile = (num, mediaType, sourceType) => { return new Promise(resolve => { wx.chooseMedia({ count: num, // 默认1 mediaType: mediaType, // 可以指定类型是图片还是视频,['image', 'video'] sourceType: sourceType, // 可以指定是拍摄还是选则文件,默认二者都有 ['album', 'camera'] maxDuration: 60, camera: 'back', success(res) { resolve(res.tempFiles) }})})} - 封装微信上传文件
//wx上传文件 const uploadFile = (filePath, isShow = false) => { if (isShow) { wx.showLoading({ title: '上传中', mask: true }) } return new Promise(resolve => { wx.uploadFile({ url: `${constant.HOST.HfModuleApi}` + '/obs/file/obsUploadMPC', filePath: filePath, name: 'file', header: { "Content-Type": "multipart/form-data", accept: "application/json", }, success(res) { // 此res中的data是开发者服务器返回的数据(里面包括图片上传成功返的网络链接) const data = JSON.parse(res.data) if (data.success) { if (isShow) { wx.hideLoading() } resolve(data.model) }}})})} - 使用自定义封装的uploadFile
// 发送图片
async takingPicture() {
  const value = await chooseFile(1, ['image'], ['camera','album'])
  if(value[0].size>10485760){
    wx.showToast({
      title: "上传失败!图片大小不得超过10M",
      icon: "none",
      duration: 1500,
    });
    return
  }
  const dataInfo = await uploadFile(value[0].tempFilePath)
  let data = {...}
  this.sendMessageFn(data)
},
保存照片到相册(需授权)
- 点击保存按钮,保存图片到相册,需要授权“访问相册权限”
- 需要用到
wx.saveImageToPhotosAlbum({})方法,此方法第一个参数filePath可以是临时文件路径或永久文件路径 (本地路径) ,不支持网络路径。
<button class="savePic" bindtap="savePoster">
  保存图片
</button>
// 保存海报到相册
savePoster() {
  let that = this
  wx.getSetting({
    success(res) {
      if (res.authSetting['scope.writePhotosAlbum']) {
        that.saveImg();
      } else if (res.authSetting['scope.writePhotosAlbum'] === undefined) {
        wx.authorize({
          scope: 'scope.writePhotosAlbum',
          success() {
            that.saveImg();
          },
          fail() {
            that.authConfirm()
          }
        })
      } else {
        that.authConfirm()
}}})},
// 授权拒绝后,再次授权提示弹窗
authConfirm() {
  let that = this
  wx.showModal({
    content: '检测到您没打开保存图片权限,是否去设置打开?',
    confirmText: "确认",
    cancelText: "取消",
    success: function (res) {
      if (res.confirm) {
        wx.openSetting({
          success(res) {
            if (res.authSetting['scope.writePhotosAlbum']) {
              that.saveImg();
            } else {
              wx.showToast({
                title: '您没有授权,无法保存到相册',
                icon: 'none'
        })}}})
      } else {
        wx.showToast({
          title: '您没有授权,无法保存到相册',
          icon: 'none'
})}}})},
//保存图片
saveImg: function () {
  let that = this;
  let imgUrl = "xxx"; //需要保存的图片地址
  wx.downloadFile({
    url: imgUrl,
    success(res) {
      // 只要服务器有响应数据,就会把响应内容写入文件并进入 success 回调,业务需要自行判断是否下载到了想要的内容
      console.log('downloadFileres', res);
      wx.saveImageToPhotosAlbum({
        filePath: res.tempFilePath,
        success(res) {
          console.log("保存图片:success");
          wx.showToast({
            title: '保存成功',
          });
        },
        fail: res => {
          console.log(res);
          wx.showToast({
            title: '保存失败',
})}})}})},
